


Are you facing issues with your 3 way floor lamp not functioning correctly?
Often, the problem lies within the wiring, which can degrade over time or become disconnected.
We'll show you the detailed steps for rewiring a 3 way floor lamp.
Let's dive in.
Key Takeaways
- Disconnecting the Old Wiring
- Identifying Wires and Socket
- Rewiring the Lamp Socket
- Testing the Lamp
Gather the Necessary Tools and Materials

Tools and materials required for rewiring a 3-way floor lamp:
- Screwdriver
- Wire Cutters/Strippers
- Electrical Tape
- Wire Nuts
- Replacement Socket
- Wire Strain Relief(Optional)
- Electrical Cable
- Multimeter
- Work Gloves
- Safety Glasses
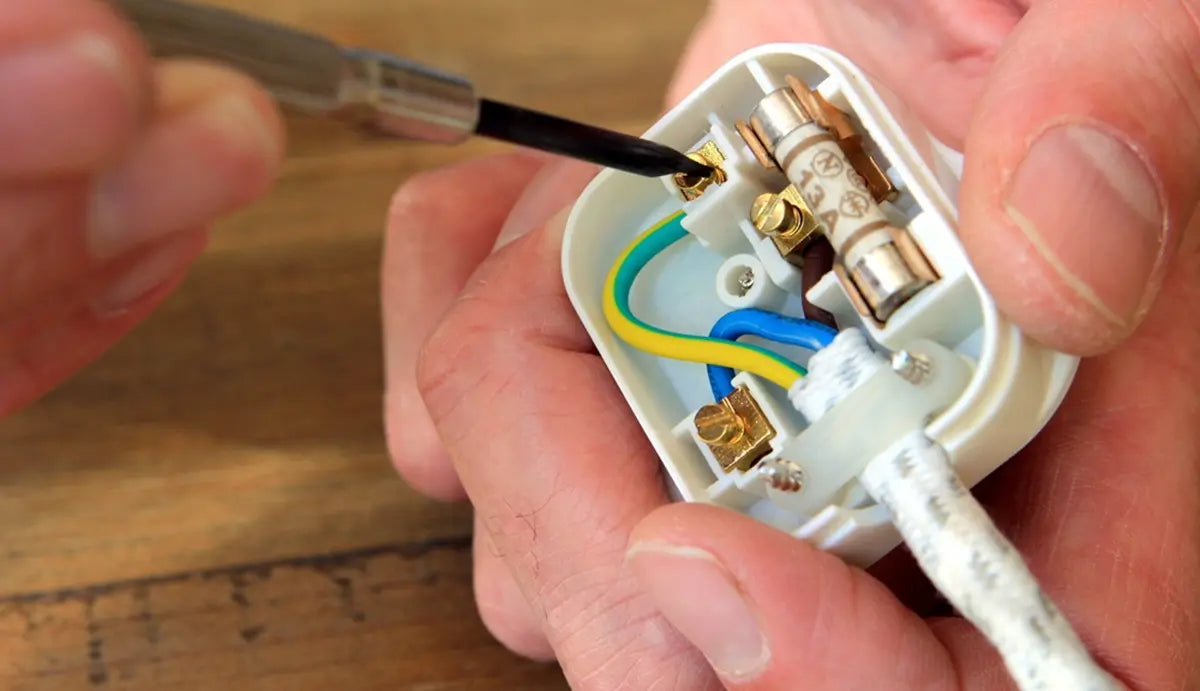
Disconnecting the Old Wiring
To safely disconnect the old wiring from your 3-way floor lamp, follow these steps:
-
Start by unplugging the lamp from the power source to avoid any electrical shocks or accidents. This step is crucial before beginning any work on the lamp to ensure your safety.
-
Carefully inspect the lamp to locate where the old wiring is connected. Depending on the design of the lamp, the wiring may be visible or hidden within the lamp base or pole. Use a flashlight if necessary to get a clear view of the wires.
-
Identify the socket where the old wiring is connected. In most cases, the wiring will be connected to the socket terminals. Look for any screws or nuts holding the wires in place.
-
Before proceeding, take a picture or make a note of how the old wiring is connected. This will serve as a reference when you are ready to rewire the lamp.
-
Using a screwdriver or appropriate tool, carefully loosen the screws or nuts holding the old wiring in place. Be gentle to avoid damaging the wires or the socket. Once the screws are loosened, gently pull out the wires from the terminals.
- If the wiring is old or damaged, consider replacing it with a new set of wires. You can find replacement wiring at most hardware stores or online retailers.
-
Once the old wiring is disconnected, inspect the socket and wires for any signs of damage or wear. If you notice any issues, it's best to replace the socket or wires before proceeding with the rewiring process.
- Properly dispose of the old wiring by recycling it or taking it to a designated disposal facility. Do not throw the old wires in the regular trash as they can pose a safety hazard.
Identifying Wires and Socket
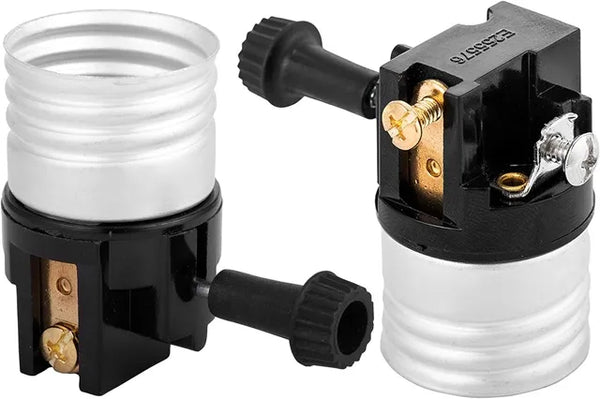
To properly rewire a 3-way floor lamp, it is essential to identify the different wires and components involved in the process. Here is a detailed explanation of how to identify the wires and sockets of a 3-way floor lamp:
Power Cord: The power cord is the main wire that supplies electricity to the lamp. It is typically connected to a plug at one end and runs through the lamp base to power the socket.
Socket Cluster: The socket cluster is the component that holds the light sockets in place. In a 3-way floor lamp, the socket cluster may contain three individual sockets that are wired to operate the different light levels.
Wires: In a 3-way floor lamp, there are typically three sets of wires that connect the sockets to the power source. These wires are color-coded for easy identification. The most common wire colors used in lamps are black, white, and green.
-
Black wire: The black wire is typically the hot wire that carries the electrical current to the socket. It is connected to the brass terminal of the socket for proper functioning.
-
White wire: The white wire is the neutral wire that completes the circuit and returns the current to the power source. It is connected to the silver terminal of the socket.
- Green wire: The green wire is the ground wire that provides a path for the current in case of a short circuit. It is connected to the grounding terminal of the socket or lamp base.
Switch: The 3-way switch is a key component in a 3-way floor lamp that allows you to control the light levels.
Rewiring the Lamp Socket
To rewire a lamp socket correctly and ensure proper functionality, follow these step-by-step instructions:
Step 1: Turn Off Power
Before starting any electrical work, always make sure to turn off the power to the lamp. Unplug the lamp from the outlet or switch off the circuit breaker that supplies power to the lamp.
Step 2: Remove the Socket Cover
Start by removing the cover of the lamp socket. Depending on the type of lamp socket, you may need to unscrew it or gently pry it off.
Step 3: Disconnect Old Wires
Carefully disconnect the old wires from the lamp socket. There are typically three wires: a hot wire (usually black or red), a neutral wire (usually white), and a ground wire (usually green or bare).
Step 4: Prepare a New Socket
If you are replacing the entire socket, prepare the new socket by removing any packaging and ensuring all components are in place.
Step 5: Strip Wires
Using wire strippers, strip about half an inch of insulation from the end of each wire. This will expose the copper wire underneath.
Step 6: Connect Wires to New Socket
Connect the wires to the corresponding terminals on the new lamp socket. The hot wire should be connected to the brass or gold terminal, the neutral wire to the silver terminal, and the ground wire to the green terminal.
Step 7: Secure Connections
Once the wires are connected, tighten the terminal screws securely to ensure a good electrical connection. Make sure there are no loose wires or exposed copper.
Step 8: Insulate Wires
Use electrical tape to wrap each wire connection.
Step 9: Secure Socket
Secure the new socket to the lamp fixture by either screwing it in place or snapping it into position, depending on the design of the socket.
Testing the Lamp
-
Before testing the lamp, ensure that all the connections have been made securely and correctly during the rewiring process. Use a multimeter to check for any potential shorts or disconnections before plugging the lamp into a power source. Double-check all the wires and connections to make sure there are no loose ends or exposed wires that could cause a short circuit or other issues.
-
Once you are confident that the rewiring has been done accurately, plug the lamp into a power source. Make sure the lamp switch is in the 'off' position before plugging it in to avoid any potential accidents.
-
After plugging in the lamp, turn the switch to the lowest setting. This should result in the light turning on at its lowest brightness level if the rewiring has been successful. If the light does not turn on, there may be an issue with the wiring connections that will need to be addressed.
-
Next, switch the lamp to the medium setting. The light should increase in brightness accordingly. If the light does not change or flickers, this could indicate a problem with the wiring or the socket. In this case, you will need to go back and recheck your connections to ensure everything is correct.
-
Finally, switch the lamp to the highest setting. The light should be at its brightest level without any flickering or dimming issues. If the light does not work on the highest setting, it could be a sign of a faulty socket or wiring connection that needs to be fixed.
-
To further test the functionality of the lamp, switch between the different brightness levels a few times to see if the light responds accordingly. If the light flickers, dims or does not change as expected, there may be a problem with the wiring that needs to be addressed.
-
Additionally, check the stability of the lamp and make sure it is not overheating during use. If the lamp feels hot to the touch or emits a burning smell, immediately unplug it and investigate the issue further. Overheating could be a sign of a wiring problem or a faulty component that needs to be replaced.
- Once you have tested the lamp on all brightness levels and ensured that it is functioning correctly without any issues, you can consider reassembling the floor lamp.
Safety Precautions
-
Turn Off the Power: Before beginning any rewiring work on a 3-way floor lamp, always ensure that the power source is switched off. Unplug the lamp from the electrical outlet to prevent the risk of electrical shock. Additionally, it is a good practice to switch off the circuit breaker to ensure complete safety.
-
Work in a Well-Lit Area: Make sure to work in a well-lit area to see the wiring connections and components of the lamp.
-
Wear Protective Gear: It is advisable to wear protective gear such as gloves and safety goggles while handling electrical components.
-
Use the Correct Tools: Ensure that you have the right tools for the job, such as wire cutters, wire strippers, and screwdrivers.
-
Avoid Water and Moisture: Keep water and moisture away from the electrical components of the lamp. Working in a dry environment will prevent electrical shorts and reduce the risk of electrical hazards.
-
Check for Frayed Wires: Before starting the rewiring process, inspect the lamp cord for any frayed or damaged wires. Replace the cord if any damage is found to prevent electrical hazards and ensure the safe functioning of the lamp.
-
Follow Manufacturer Guidelines: If you have the manufacturer's instructions for the lamp, follow them carefully during the rewiring process.
-
Secure Loose Connections: Ensure that all connections are secured tightly to prevent any loose wiring.
- If at any point you feel uncertain about the rewiring process, consulting with or hiring a certified electrician is advised.
Final Thought
Now that you’ve learned how to rewire a 3-way floor lamp, please share your experiences or additional tips in the comments below.


Leave a comment
All comments are moderated before being published.
This site is protected by hCaptcha and the hCaptcha Privacy Policy and Terms of Service apply.